
Create Live XP CD [Without Using Bart PE]
If you are regular here, few weeks ago I had written an article “how to create live XP/Vista CD/DVD/USB“. Few readers had asked me to write a new simplified article which shows the making of Live XP without any hassle. So, I am writing this new guide for XP lovers.
Here I am re-writing the article by assuming that you are going to create Live XP CD. To create live XP CD, you need have internet connection. If you don’t have internet connection you need to wait for few days as we will write about creating Live USB drive using another method. Make sure your system is connected to the internet.
Essentials:
1. Winbuilder (download from here)
2. Windows XP CD
3. Internet Connection
4. Blank CD
1. Download Winbuilder (Free) from here, extract the zip file to a folder called “Live XP” on your Desktop (assuming that you have a minimum of 700MB free space on your C Drive).You can even choose any other drives or folders to extract the Winbuilder zip file. Make sure you have enough amount of free space before proceeding further.
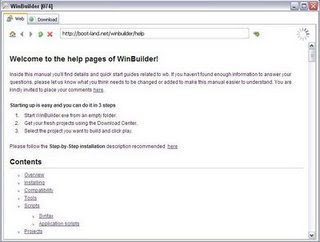
2. Run Winbuilder.exe file from the Live XP folder, below is the welcome screen you will see at the first time. Download screen is the screen where you need to choose the tools, drivers and other applications required for the live CD.

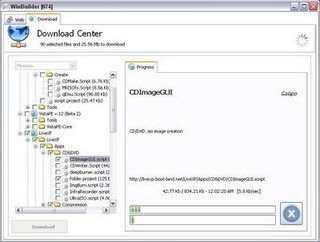
3. Switch to Download tab, uncheck the box named “Optional”, and click Download button located at the bottom left of the pane to start the download of essential scripts and tools for your XP live CD.

4. Once Winbuilder finishes the downloading process, it will show you the below screen. Click on Play button located at right top.

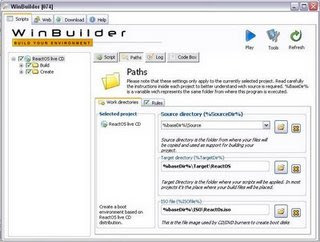
5. Insert your Windows XP CD into the CD/DVD drive and browse the same from the Winbuilder (Refer screenshot).

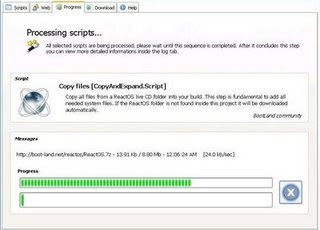
6. Click Continue button to start the live CD building process. It will take few minutes to finish the process. If Winbuilder process prompts any confirmation message, click “yes” or “Ok” to continue the building process.

7. Once it finishes the building of Live XP image process, you need insert a blank CD so that it burns the Live XP image file into the blank CD. Keep the burn speed at minimum to get the best results.

8. If you have followed the procedure neatly, you will have a Live XP CD in your hand.
9. Once you get the Live XP CD, you can insert and check the new Live XP CD.
PS: I tried to use the latest version of Winbuilder before the proceeding to the older version which I used in this guide. The reason is this version is stable than the newer version like XP. So, I recommend the stable version instead BETA.
If you have any problems in following the above procedure feel free to ask your doubt in the form of comments. And finally, don’t copy this article to any other sites or forums without the permission and back link.
*****
How To Create Live USB/CD/DVD OF Vista/XP
You might have read many tutorials, which guide you to make Vista/XP live CD using Barts PE software. Bart’s PE procedure is pretty time consuming as well as old. In this tutorial I am going to show you the Vista/XP live CD and Vista/XP live USB stick without using the old Barts PE freeware. Let’s start the procedure.I have tried to keep the tut as small as possible.
[Read How To Create Live XP CD (easy procedure)]
Required Software(s) and other things
1.Microsoft Windows XP/Vista CD/DVD
2.Two GB or more capacity pen drive
3.Net connection( No need to worry for speed connection. I am doing this on MO). It’s matter of few MBs
4.CD/DVD to make live CD/DVD.
5.Man of the match..Sorry, I mean, WinBuild software, using which we are going to create live CD.
*Download the WinBuild Here(It’s just 834KBs!!!)
*Extract the file and copy it to a ‘New Folder’(Recommended requierd space is 2GB)
*Unpack and Run Winbuilder(no installation required!!!)
*On your mark, get set, go…
1.The first screen of WinBuilder gives you the brief explanation on how to use this magnificent program. You can read all the necessary instructions here. Press on the “Download” tab to proceed further.
2.This is the download screen of WinBuilder were you need to select required tools, drivers and other crusial applications required for a live CD/USB. As you can see in the screen shot you need to select one option from the three(‘Recommended’ or ‘Complete’ or ‘Minimum’) options in the drop down menu. You can further remove from the list which shows just below these three options.
3.After selecting required option,press ‘Download’ button which is located just below the left side pane. Time required to download depends on what optins you have selected in the left side pane just before. Download size is around 40 MB.
4.The next one is ‘Scripts’ tab.Once again you will see a list of options on the left pane of the wizard. Here, check the ‘VistaPE MUltiboot’/XP option and expand the tree further.
5.Expand the tree named ‘Applications’.In this option, you will see all the available sections of applications,which you can add to your live Vista/XP CD/USB.
6.Next screen is ‘Finalize’ option. It might take few minutes to build the live media.If you like to create live CD select the ‘Create ISO’ option and provide the label for the CD.
7.Suppose, if you planning to make a bootable USB drive, then select the ‘Copy to USB device’ option.
8.Click on the ‘Paths’ tab, and provide the path of the USB drive, which has the Windows Vista/XP DVD in the source directory filed and click on the ‘Play’ button.
9.Extraction process takes place. Wait for a minute.
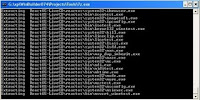
Wait for few seconds to see you. Burn the ISO to get your dream live Windows
10.Now,your bootable USB/CD is ready.
11.Insert the CD/USB and kick start the your own windows live!!!
(Will add more screen shots soon)
Note: Make sure your system supports ‘booting from the USB’ before creating the live USB.
Under vista you will need to disable the UAC (User Account Control)
Download Vista Live
Sumber : http://www.intowindows.com/
If you are regular here, few weeks ago I had written an article “how to create live XP/Vista CD/DVD/USB“. Few readers had asked me to write a new simplified article which shows the making of Live XP without any hassle. So, I am writing this new guide for XP lovers.
Here I am re-writing the article by assuming that you are going to create Live XP CD. To create live XP CD, you need have internet connection. If you don’t have internet connection you need to wait for few days as we will write about creating Live USB drive using another method. Make sure your system is connected to the internet.
Essentials:
1. Winbuilder (download from here)
2. Windows XP CD
3. Internet Connection
4. Blank CD
1. Download Winbuilder (Free) from here, extract the zip file to a folder called “Live XP” on your Desktop (assuming that you have a minimum of 700MB free space on your C Drive).You can even choose any other drives or folders to extract the Winbuilder zip file. Make sure you have enough amount of free space before proceeding further.
2. Run Winbuilder.exe file from the Live XP folder, below is the welcome screen you will see at the first time. Download screen is the screen where you need to choose the tools, drivers and other applications required for the live CD.
3. Switch to Download tab, uncheck the box named “Optional”, and click Download button located at the bottom left of the pane to start the download of essential scripts and tools for your XP live CD.
4. Once Winbuilder finishes the downloading process, it will show you the below screen. Click on Play button located at right top.
5. Insert your Windows XP CD into the CD/DVD drive and browse the same from the Winbuilder (Refer screenshot).
6. Click Continue button to start the live CD building process. It will take few minutes to finish the process. If Winbuilder process prompts any confirmation message, click “yes” or “Ok” to continue the building process.
7. Once it finishes the building of Live XP image process, you need insert a blank CD so that it burns the Live XP image file into the blank CD. Keep the burn speed at minimum to get the best results.
8. If you have followed the procedure neatly, you will have a Live XP CD in your hand.
9. Once you get the Live XP CD, you can insert and check the new Live XP CD.
PS: I tried to use the latest version of Winbuilder before the proceeding to the older version which I used in this guide. The reason is this version is stable than the newer version like XP. So, I recommend the stable version instead BETA.
If you have any problems in following the above procedure feel free to ask your doubt in the form of comments. And finally, don’t copy this article to any other sites or forums without the permission and back link.
*****
How To Create Live USB/CD/DVD OF Vista/XP
You might have read many tutorials, which guide you to make Vista/XP live CD using Barts PE software. Bart’s PE procedure is pretty time consuming as well as old. In this tutorial I am going to show you the Vista/XP live CD and Vista/XP live USB stick without using the old Barts PE freeware. Let’s start the procedure.I have tried to keep the tut as small as possible.
[Read How To Create Live XP CD (easy procedure)]
Required Software(s) and other things
1.Microsoft Windows XP/Vista CD/DVD
2.Two GB or more capacity pen drive
3.Net connection( No need to worry for speed connection. I am doing this on MO). It’s matter of few MBs
4.CD/DVD to make live CD/DVD.
5.Man of the match..Sorry, I mean, WinBuild software, using which we are going to create live CD.
*Download the WinBuild Here(It’s just 834KBs!!!)
*Extract the file and copy it to a ‘New Folder’(Recommended requierd space is 2GB)
*Unpack and Run Winbuilder(no installation required!!!)
*On your mark, get set, go…
1.The first screen of WinBuilder gives you the brief explanation on how to use this magnificent program. You can read all the necessary instructions here. Press on the “Download” tab to proceed further.

2.This is the download screen of WinBuilder were you need to select required tools, drivers and other crusial applications required for a live CD/USB. As you can see in the screen shot you need to select one option from the three(‘Recommended’ or ‘Complete’ or ‘Minimum’) options in the drop down menu. You can further remove from the list which shows just below these three options.
3.After selecting required option,press ‘Download’ button which is located just below the left side pane. Time required to download depends on what optins you have selected in the left side pane just before. Download size is around 40 MB.

4.The next one is ‘Scripts’ tab.Once again you will see a list of options on the left pane of the wizard. Here, check the ‘VistaPE MUltiboot’/XP option and expand the tree further.
5.Expand the tree named ‘Applications’.In this option, you will see all the available sections of applications,which you can add to your live Vista/XP CD/USB.
6.Next screen is ‘Finalize’ option. It might take few minutes to build the live media.If you like to create live CD select the ‘Create ISO’ option and provide the label for the CD.

7.Suppose, if you planning to make a bootable USB drive, then select the ‘Copy to USB device’ option.
8.Click on the ‘Paths’ tab, and provide the path of the USB drive, which has the Windows Vista/XP DVD in the source directory filed and click on the ‘Play’ button.

9.Extraction process takes place. Wait for a minute.

Wait for few seconds to see you. Burn the ISO to get your dream live Windows
10.Now,your bootable USB/CD is ready.
11.Insert the CD/USB and kick start the your own windows live!!!
(Will add more screen shots soon)
Note: Make sure your system supports ‘booting from the USB’ before creating the live USB.
Under vista you will need to disable the UAC (User Account Control)
Download Vista Live
Sumber : http://www.intowindows.com/